Course Material: Teaching a Vector Robot to detect Another Vector Robot
Introduction
Machine Learning, Robotics, Convolutional Neural Networks
Introduction
This course tutorial teaches you the basics of object detection via the YOLO (You Only Look Once) algorithm, which is a state-of-the-art, real-time object detection system. When YOLO was introduced, it was the first approach which applied a single neural network to classify an image. The original YOLO paper is available here. The official YOLO repository is here. While this tutorial does not require a thorough understanding of how YOLO works, here is a great article if you are really interested in a deep dive.
YOLOv5
In this tutorial, we use the most recent generation of YOLO (called YOLOv5). An interesting introduction to YOLOv5 is available here.
This tutorial also makes use of the Anki Vector robot (assets currently owned by Digital Dream Labs LLC) which was first introduced in 2018. In my opinion, the Vector robot has been the cheapest fully functional autonomous robot that has ever been built, and therefore it serves as a great practical use case for this tutorial. However, you do not need to possess a Vector for the purpose of learning via this tutorial.
Training a YOLOv5 Model
We will work through the following steps.
1) How to train a YOLO model with the help of a custom data set which has been generated by labeling images of another Vector robot, as seen from one Vector robot’s camera. While we will show one example, the intent is that you can plug and play different customized models and get a sense of how this really works.
2) Once we have a trained Yolo model, we will run inference to detect Vector in some videos pre-recorded from Vector’s cameras. I will show you how inference works, and then you can apply your models to see how they detect the Vector robot in the videos.
3) Potentially, you can create your own video and examine how your trained model does against this video.
I have created a detailed Google Colab page discussing this project here. I would strongly encourage you to keep this open while you read through this project. Here is a snapshot from Google Colab.
Labeling Data:
One hidden pain in all supervised ML/ deep learning approaches is the requirement of diverse labeled data the models can be trained on. In fact, having good labeled data has become one of the biggest impediments for applications of deep learning.
For this tutorial, I generated the labeled data set myself. I took pictures from my Vector’s camera with another Vector facing it and had this other Vector move freely so as to capture pictures from different angles. I then labeled these images by marking the rectangular regions around Vector in all the images with the help of a free Linux utility called labelImg. Figure 1 shows how labeling an object boundary looks like. Altogether, I took 320 such pictures of Vector in multiple poses and hand-labeled them. As you can imagine, hand labeling turns out to be very time consuming; so if you are willing to pay for services, Amazon Mechanical Turk might be a valuable resource.
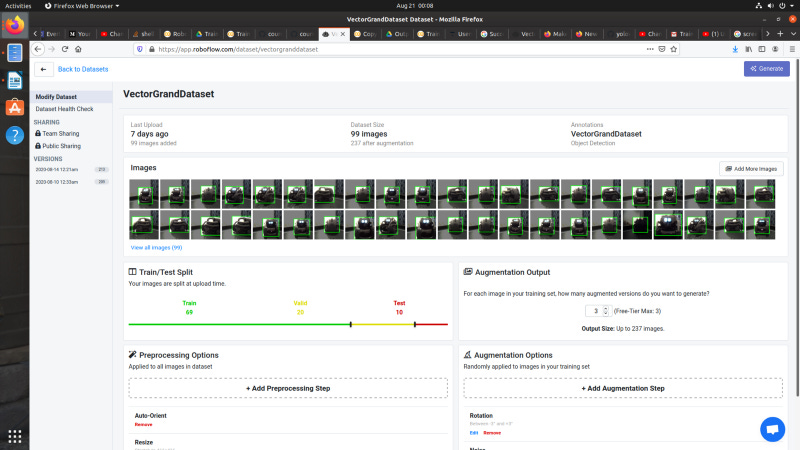
Then, I used the roboflow.ai service to generate a labeled data set with train, validation, and test partitions. Roboflow.ai is extremely useful because it automatically provides various pre-processing steps (e.g. resizing the pictures to a standard 416x416 size that the models can consume), as well as augmentation steps which include inserting noise into the picture or inserting rotations. I then clicked on the “Generate” button to create a labeled data set. This labeled data set is publicly available here, and you are very welcome to use it. A snapshot from the roboflow.ai service is available in Figure 2.
Training
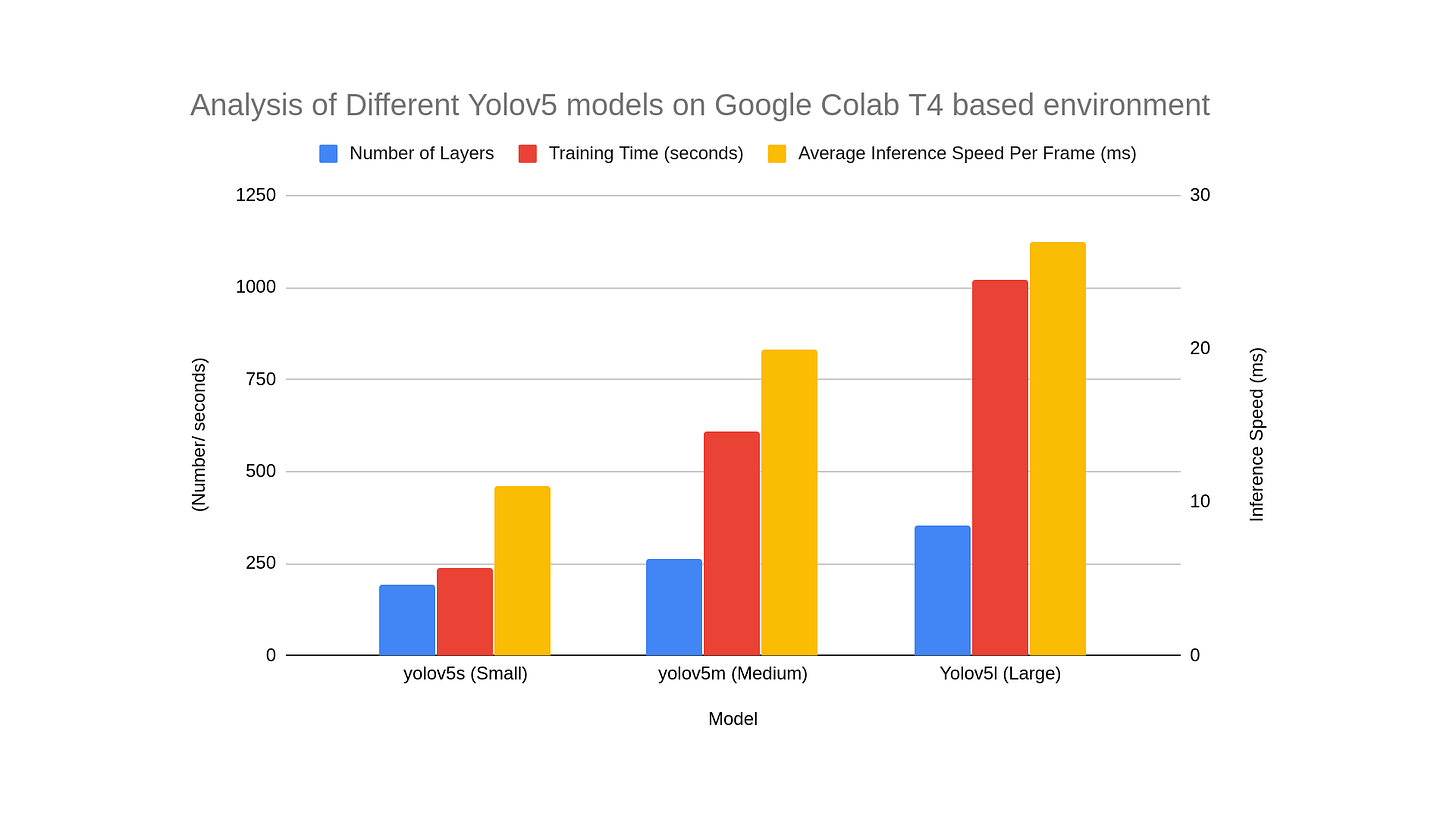
Unless you really want to set up your personal computational environment with GPUs, I would strongly recommend Google Colab. Google Colab has free GPUs, which makes it an extremely useful example for training purposes. At this point, it will be very useful for you to have the Google Colab notebook open. (As previously remarked, it is available here). For the purpose of training, I made use of the default yolov5 models. I chose to train to 50 epochs, which took about 4 minutes to train the yolov5s (small) on the Tesla T4 GPU in Google Colab. My experience with Google Colab is that you might get a GPU out of any of the following: (i) Tesla K80. (ii) Tesla P100, (iii) Tesla P4, or (iv) Tesla T4. The training time will change depending on which GPU you get. The model size indeed plays a major factor in the time to train, with a yolov5l (large) model, it took me 18 minutes to train in the same environment. A detailed comparison of the three different Yolov5 models is in Figure 3. Note that as the size of the model increases in terms of the number of layers, so does the training and inference speed. Understanding how different factors affect the performance of training machine learning is a very important art to learn, and I will strongly encourage you to play with the Google Colab Notebook and try how it works on your own.

Figures 4 and 5 compare the speed of training and inference of the three models between two GPU environments: The Nvidia Tesla T4 released in 2018 and based on the Turing architecture and the Nvidia Tesla K80 based on the Kepler architecture.
Inference
Once you have trained your model, now comes the fun part. We will apply the model on some randomly taken videos capturing Vector’s camera feed, and check if another Vector which appears in the camera feed can be detected. I have supplied two examples of camera feeds Video 1 and Video 2. Video 1 has the same background as the images in the labeled data set. To check how our model works when a different background is chosen, we placed some toys and then shot Video2.
Here is the result of inference applying the yolov5s (small) model on Video 1.
Note that the inference is extremely accurate. The bounding box is precise, and the probability of successful detection exceeds 0.8 at all times. In a couple of brief instances, a bounding box appears with a probability of ~0.4. With a safe threshold (0.5), we can conclude that our model will detect Vector reasonably accurately.
Now let us see the result if the same model used for inference on Video 2.
There are misses at times when Vector comes close to the camera (possibly because the labeled data set did not have images from such close proximity). However, for the most part, the detection is accurate.
And now, for fun, let's see how a large model (yolov5l (large) trained on the same data set performs on Video 1 and Video 2. Let us check the result on Video 1 first.
Comparing with the output from yolov5s (small) model above, it is easy to see that the result is better, the bounding boxes around Vector are much more tightly with the large model, and the probability of successful identification is incrementally better than the first video (At many frames, the success factor crosses 0.85). Thus it is clear that for this specific example, the large model fared well. Now, let us examine the output from Video 2.
And you can very wells see that for this specific example, the large model is a disaster. It rarely detects Vector in the first half of the video, and also erroneously thinks the image of the cat of the toy train to be that of Vector. The large model has a large number of parameters and is therefore very prone to overfitting. In this case, it is very clear that the model gets trained to associate eyes with Vector. And it associates wherever it sees eyes with Vector, including the picture of the cat on the toy train.
So how can the large model be made better? The answer lies in enhancing the quality of the input labeled data set. The original data set was poor in terms of diversity of data, it had images with the same background, and relatively similar distance at which the Vectors were spaced. A good labeled data set should be very diverse, so that trained models can avoid getting over fit and biased. And there lies one of the major challenges in deep learning: having access to high quality labeled data sets which are truly representative of the problem settings where the model needs to be applied.
Try it out yourself?
Here are some suggestions for you to try out as you approach this tutorial.
(1) First, make a clone of the Google Colab project and try to run it as is, so that you get comfortable with the entire workflow.
(2) Now, try to change the model. The example code uses yolov5s.yaml model which trains pretty quick as well as allows quick inference. How does the training time, quality of the result, and inference time change as you switch between the 4 different default models available in the Yolov5 repository?
(3) The last cell (Appendix A) provides an example of how you can build your own Yolov5 models. Try to use this model (Just save it as a file) and use that file instead of training. How does this model perform?
(4) If you disconnect the Colab runtime and connect it again, you are likely to get a different GPU. Make a note as to how the training and inference times change with different GPUs.
Conclusion
The intent of this tutorial was to illustrate how to train a YOLOv5 model to recognize a specific object (Training Vector to recognize another Vector in this case). I hope you had fun trying this out. Please use the comments section if you want to discuss any thoughts, comments, questions, or results with me.


